
This pregnancy Jason has had a couple of really good faux pas. I thought I would write them down, so I can make sure he never forgets.
I might have not gotten the wording just right, but this is basically what he said.
1. This is said to the pregnant wife, while going through first trimester yucks.
"You weren't sick with the other ones, right?"
Wife glares and thinks husbands have a better pregnancy memory loss than women. My Mom verified that my Dad made the same comment and my Mom was deathly ill with all 6 pregnancies.
2. While talking to someone from his past and someone wife has never met. The topic of who they know that is having babies comes up. Husband segways with "She is usually not this fat, we are expecting another one." I laugh - because I am still too happy about having had my ultrasound earlier that day and I am holding the worlds cutest baby swimsuit - so who cares, but I did remind him he was an idiot later. He tried to redeem himself by claiming that the shirt I was wearing made it hard to tell if I was pregnant.
Love you Jason!!
Tuesday, May 18, 2010


Monday, May 17, 2010
For Everyone Who Has Been Wondering!
I am FINALLY ready to announce.
YES I am pregnant!
AND.....
It is a......
GIRL!!
We are very excited for Charlotte to have a sister. She will make her earthly debut early October (almost the same due date as Grahms). I am nervous as to how I am going to sew for two (I know my Mom sewed for 5-6 at a time - SUPER WOMAN).
Yes, she will be born in Japan (in a military hospital). I hear the hospital is great.
Time to really start planning colors, clothes (I bought the cutest little swim suit for her for next summer), etc...
Friday, May 14, 2010
TipJunkie!
The TipJunkie did a fabulous post on repurposing old clothes for the little kids. There are some very cute ideas (one of them mine!!!)
Check them out HERE.
I think I am going to have to try the sweater dress tutorial. I think it still gets cold enough in Japan for a sweater dress!!
Check them out HERE.
I think I am going to have to try the sweater dress tutorial. I think it still gets cold enough in Japan for a sweater dress!!
Tuesday, May 11, 2010
The Fused Plast Project I Wanted to Do!

I once fused vinyl on to cute fabric and had a cute waterproof bib for awhile, but the vinyl got holes in it. So I ripped off the vinyl and still use the fabric bib today and it is still cute and works. Except when she spill chocolate milk - then it just soaks through.
The Starburst bib was easy to make, relatively cheap - but I don't think it will hold up any better than the other versions. Holes to come in the corners. So I think I will stick to fabric.

Friday, May 7, 2010
Fused Plastic Projects!

I first saw an idea for a belt HERE. Super fun for the kids. I have been working on my own idea, but that is the one that has not gone smoothly - we will try again next week since this worked out so great. This SITE has a great tutorial for fusing plastic.
These bags were not my first choice of a project, but have become a necessity. The boys needed something to put their handhelds and games in to keep it all together. We kept hunting for games and no one could remember where they put them. I also realized that these would come in handy for their carry ons during our long flight overseas! They like that the outside layer is candy wrappers, start saving your plastic for your own projects.


It Just Froze Over!

Well, today - Jayce has a friend over and it is raining. So to try and give him and his friend some room to breathe, I am entertaining the Grahm and Charlotte with novelties!!


I had better get back, I am sure it is time to vacuum!!
A project post later today.
Thursday, May 6, 2010
Charlotte's Easter Dress!

Yes, I made her dress again this year. I started something with the first dress I made her and now I feel like I can't buy one or I would be letting myself down and others - ah! pressure!
I used a vintage dress pattern again (in fact it is the same one as last Easter and last Fall). It was going to be a different pattern, but she does not grow as fast as my boys did. I always put them in clothes that cooridinated with their age, not Charlotte! I enlarged the bodice just a touch to make sure if she did grow she would not be out of it in a month and lengthened it.
I still wanted the look of the other pattern, so she has a big square collar. The collar is great because it is removable. The first sunday she wore it she ended up with crayon on the collar and goldfish- so nice that I could just wash the collar!


Tuesday, May 4, 2010
The Easter Clothes!
I have been very slow posting pictures of Easter and their church clothes for several reasons. 1 - Even though Turquoise is the color of 2010, they are not all created equal and not everyone knows that it is the color of the year, 2 - Finding a nice day outside to take pictures AND all 3 kids.
I am not sure why I even tried to get a pictures with all 3 kids. Trying to get all 3 of them to look at the camera and smile or just look normal is not possible. It only checks to see if I have learned patience. I am not sure if I have learned patience, but I know a loosing battle when I see one.
So, I tried to take a few at one spot - moved them to the next one and said never mind - go change!! To which they all started to claim they wanted to take more pictures - Ahuh, sure!! Go Change!!
By the way, they swear they are really trying to give me good smiles. They just don't know how! (or so they said).


 I think the best one is when I said, nobody smile.
I am not sure why I even tried to get a pictures with all 3 kids. Trying to get all 3 of them to look at the camera and smile or just look normal is not possible. It only checks to see if I have learned patience. I am not sure if I have learned patience, but I know a loosing battle when I see one.
So, I tried to take a few at one spot - moved them to the next one and said never mind - go change!! To which they all started to claim they wanted to take more pictures - Ahuh, sure!! Go Change!!
By the way, they swear they are really trying to give me good smiles. They just don't know how! (or so they said).


Friday, April 30, 2010
JCrew Style Flower Tutorial!
A friend recently asked me to figure out how to make these flowers and then teach her how to do it. So here you go!! This is based on a JCrew floral headband. You can make hairclips, corsage, headbands, pin it on your purse, etc...
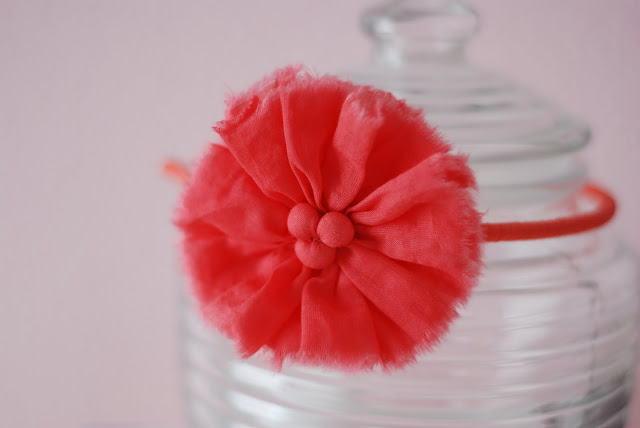 This will make 1 flower.
1. Cut 2 strips of fabric 1.5" wide and 11.5" long (you could make it longer!!).

2. Run a gathering stitch down one edge of the strip. You can use a sewing machine or do it by hand!


3. Stitch the ends together. Stitch by hand.


5. Now you need to hide the handstitched ends. Arrange the gathers so the ends are tucked in a fold. Gently press to keep the ends hidden.


7. Wrap up a piece of cotton in the fabric and secure it by hand sewing. It will look like a Halloween Sucker Ghost.
8. When you have all 3 done, you will need to hook them together. You can handsew them or tie them together by wrapping the remaining thread ends around and knotting it.

9. Next you will take your flower center and carefully stuff the ends through the center of each circle.


1. Cut 2 strips of fabric 1.5" wide and 11.5" long (you could make it longer!!).

2. Run a gathering stitch down one edge of the strip. You can use a sewing machine or do it by hand!


3. Stitch the ends together. Stitch by hand.


4. Pull the gathering threads until the center closes up. Secure the gathers by either handstitching or I grabbed all the gathering thread ends and tied them in a knot.

5. Now you need to hide the handstitched ends. Arrange the gathers so the ends are tucked in a fold. Gently press to keep the ends hidden.

6. For the Center: Cut out 3 small squares of fabric and tear up a cotton ball. I did not use all of the cotton ball, you need 3 small pieces.

7. Wrap up a piece of cotton in the fabric and secure it by hand sewing. It will look like a Halloween Sucker Ghost.
8. When you have all 3 done, you will need to hook them together. You can handsew them or tie them together by wrapping the remaining thread ends around and knotting it.

9. Next you will take your flower center and carefully stuff the ends through the center of each circle.


10. Pull a few threads from the edges to fray them.
11. You will need a piece of fabric or felt for the back. I simply sewed 2 pieces together to make these fabric backs.


12. Finally, you are ready to glue it to whatever you like. Brooch pin, hair clip, headband, etc... I used hot glue! I also added a few dabs of glue in between the 2 circle layers to help secure the center (these you want very small and right at the center).

This could be used to make a lasting corsage for Mother's Day!
Wednesday, April 28, 2010
Knotty Fairy Adventures!
Every single night poor Charlotte is visited by the Knotty Fairy, cousin to the Tooth Fairy. The Knotty Fairy sneaks into your bedroom late at night and plays in your hair while you sleep. I have not decided if she is harmless or actually enjoys the mischief. Either way she loves Charlotte's hair! Do I hear the beginnings of a story here? Wait and see!

Tears to Follow!!!
Subscribe to:
Posts (Atom)

 Posts


